
WHY?
This customer came into our shop after having shopped at some other local places and not finding what he was looking for. He told us he wanted something with plenty of volume and good bass response.
When we first jumped in his truck to listen to the factory Bang and Olufsen, he turned the volume all the way up and said it wasn’t loud enough. This is not uncommon for us to see during the discovery phase of the consultation. We need to get to know you and your listening preference in order to make suggestions to get you the system you’re in search of.
Throughout the consultation, I learned that the customer was a huge fan of JL Audio and had used JL in most of his previous systems, so we designed a full JL Audio system with plenty of power and bass to meet the client’s needs. This truck sounded great and the image in the front was spot-on accurate.
WHAT?
Links to all Products Used:
1. B&O OEM Amplifier Integration Harness(Updated)
2. Front and Rear Speaker AMPLIFIER (JL Audio VX600/6i)
3. Subwoofer AMPLIFIER (JL Audio XD600/1v2)
4. DRC-100 DSP/Bass Control Knob
5. Front speakers (Morel in place of JL)
6. Front Speaker Plate Adapters
7. Rear Speakers (Morel in place of JL)
8. JL Audio Stealthbox w/Subwoofers
9. Power and Ground Wire
10. Power&Ground Distribution Block
11. RCA Cables (x4)
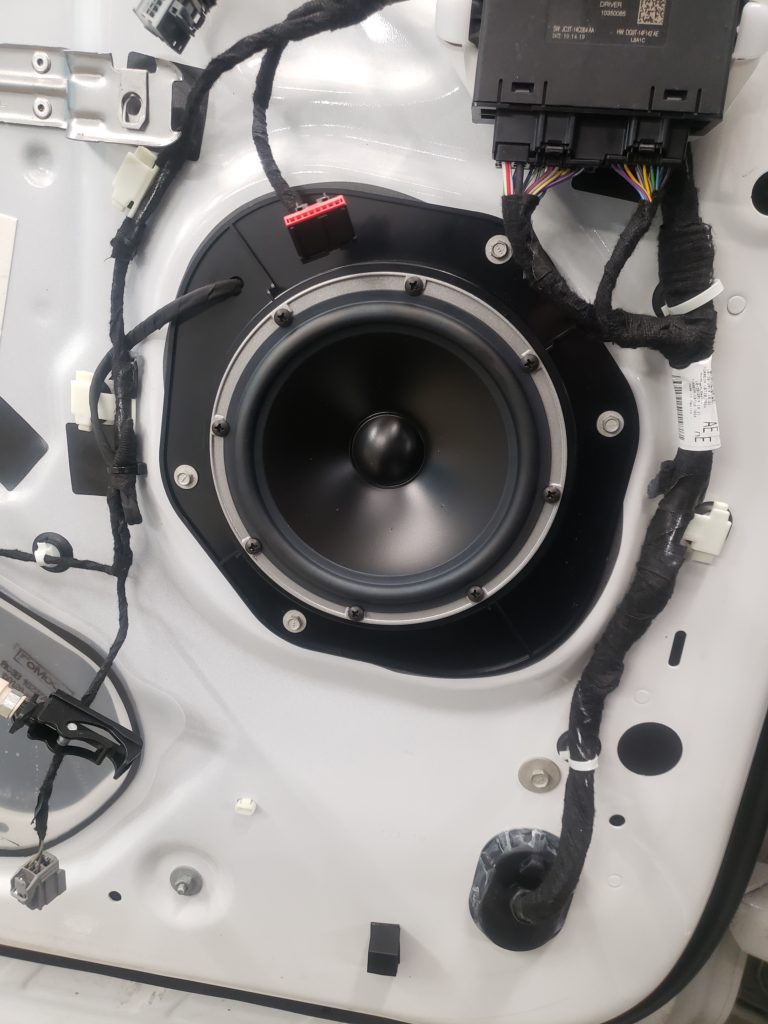
Replaced front door speakers – We replaced the front door speakers and dash speakers with the JL Audio C5 6.5” components. We used the C5’s because they offer great performance and they matched up well with the amplifier we used. (No longer available as of 10/2022 Link above to our recommended replacement option)
Replaced rear door speakers – We matched the rear speakers to the front and did the C5 6.5” coaxial speakers. We wanted to ensure we had enough volume in the truck, so we wanted a speaker that could handle some power in the rears as well. (No longer available as of 10/2022 Link above to our recommended replacement option)
Added amplifiers – We knew that we wanted to power the front speakers actively, which means that each tweeter and each door woofer gets their own channel, and the customer wanted rear speakers incorporated into the build. Since the subwoofer we were using required at least 300-400 watts RMS, we needed to use two separate amps on this build.
We prefer to run the front speaker actively so we can better tune them individually. When tuning the system using the Digital Signal Processor (DSP), having control of each speakers independently allows us to create a much more accurate image, but also we are not restricted by what the passive crossover is allowing us to feed to each speaker. A passive crossover comes with component speakers to prevent the average person from accidentally blowing a speaker, by allowing only certain frequencies to play through to each speaker. We are able to separate the frequencies using the DSP software on a tuning laptop.
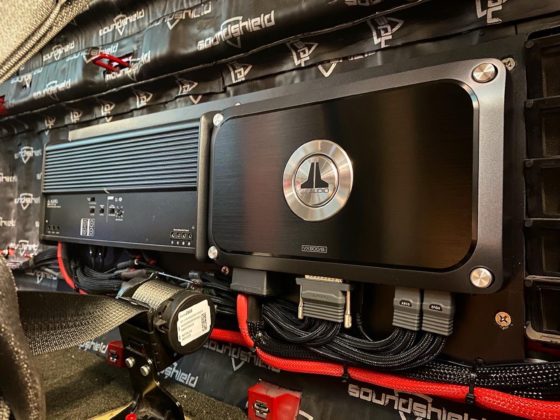
We decided to use the JL Audio VX600/6i to power the front component speakers actively, as well as the rear coaxial speakers. We use the JL Audio VXi style amplifiers often because they provide a lot of power in a small footprint, and they have integrated DSP which means one less thing to install and hide. The VXi series also have a pre-out on the amp so you can tie a mono amp into the DSP tune, as if it were another channel on the VXi amplifier.
Channel Layout
1 and 2 – Tweeters
3 and 4 – 6.5” Front Door Woofers
5 and 6 – Rear Door Speakers
Add subwoofers and mono amplifier –
The customer wanted to ensure he had enough bass in the truck, so we definitely wanted to go for a dual-sub setup. We felt the best use of his money to get him the bass he wanted was to use the JL Audio Stealth Box made for his vehicle. This setup comes with two 12” TW3 subwoofers, which can get plenty loud, but also hit very deep notes smoothly.
We used the JL Audio XD600/1v2 to power the subwoofer, this way the sub gets full power and the amplifier is not having to strain to provide the power. We used the DRC-100 for the bass knob and tune selector for the system. The DRC-100 is one of our favorite pieces because it provides a super sleek look, and has the ability to switch through as many as 9 tunes on the DSP (Digital Signal Processor).
HOW?
Elevated Audio is known first and foremost for our customer’s overall experience from beginning to end. Winning the North American 2018-2019 Customer Choice Award in the 12-volt industry-validated our commitment to provide trusted interactions between our store in Denver and our customers.
We are using some great equipment in this install so it would be a shame to perform a bad install. Good thing we have a North American Top 12 Installer on our team!
Here’s how we performed the installation.
WIRING
This Ford Super Duty had the factory Bang and Olufsen audio system, so we used the NavTV ZEN module to grab a clean audio signal from the factory head unit. In this application, the ZEN module replaces the factory amplifier, so we needed enough channels to power every speaker in the vehicle. We use the NavTv ZEN modules often and they are a reliable piece to use for integrating into the factory fiber optic audio system.
Power is supplied to the amplifiers utilizing our four-gauge pure copper wiring. Never use copper clad aluminum (CCA) if you want the best current flow!
MOUNTING AMPLIFIERS
In order to keep everything as concealed and clean as possible, we built a custom amp rack in the factory amplifier location to house both JL Audio amplifiers, as well as the NavTv ZEN module. Everything was permanently mounted behind the rear seats.
All wiring is wrapped in Tesa tape for a factory look and feel. The wiring routes in factory channels throughout the vehicle and is not merely “tucked” under panels, which always find a way to wiggle out after a few months. It’s our goal to make it hard to differentiate factory wiring from aftermarket.
CALIBRATING THE AMPLIFIERS
Amplifiers are useless unless set up correctly. Elevated Audio always sets the gains of our amplifiers by using an oscilloscope. We also use the oscilloscope to level match the radio, meaning we figure out at what volume distortion is added to the system from the factory head unit. For example, your factory head unit may go up to 40 on the volume scale, but it may only be putting out a clean signal up to 34. We will tune the system to be max output at that max safe number. This tool allows us to read the clipping point and set the amplifier to play up to that point but never beyond it, protecting the entire system and your ears!
DSP TUNING
Since the 6-Channel is a DSP amplifier and allows us to modify the whole audio experience, we set a microphone in the vehicle to capture the pre-tuned sound. We use this data to offset any peaks and valleys in the acoustic response to meet a particular response curve that our ears love. This creates music that sounds like the artist intended it to sound.
Another powerful tool in the DSP is the ability to time the sound. We measure the distance from each speaker to determine the firing order of the speakers. This process allows them to all hit your ears at the same exact time.
This process, along with level matching, allows a stage and image to be created on top of your dash. Now our customer can hear and imagine the artist and their band playing on top of his dash.
LEVEL CONTROLLER
The DRC-100 controller is flush-mounted into the center cubby under the radio for easy access, and the LED that indicates which tune is active is mounted is mounted in the pocket to where only the glow can be seen. The LED light with this knob are programmable, which means the customer can choose their favorite color of illumination.
SPEAKERS
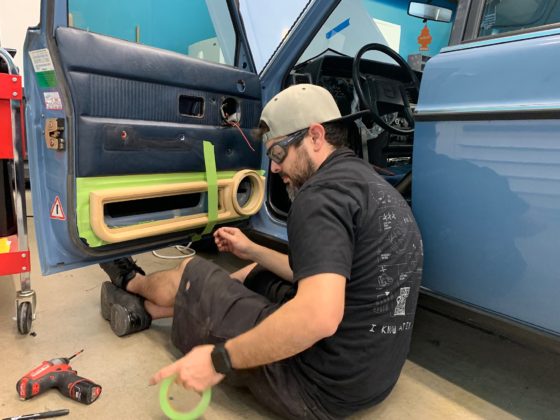
We used the JL Audio C5 6.5” component speakers in the front of this Ford, and we went with the JL Audio C5 6.5” coaxial speakers for the rear doors to match the fronts. We were able to order vehicle-specific speaker adapters to properly install the speakers using factory bolts and factory holes in the front doors, but the rear doors were different and we built our own custom-fit speaker plates. The last thing we want to do is blast new holes in your door to mount the new speakers!
THE RESULT!
The customer loved the end results, we were able to build a system that gave the him the volume and bass he was wanting. We did a driver focused tune for when he is in the vehicle alone, and a full-car tune for when he has friends in the truck. We gave him a noticeably louder audio system, while keeping the system sounding clean, even at higher volumes. The front-seat tune imaged great as well, this system gives you the clarity for easy-going music, and the power and bass for party music.
This system was a success and the JL Audio product line offers some fantastic products, but we have a wide range of brands that offer their own advantages. Contact us today so we can custom tailor a system to your music and listening preferences!
Music. It’s What Moves Us.
-Elevated Audio


-

- Vehicle’s EQ before DSP tune
-

- Vehicle’s EQ after the DSP tune
Like!! I blog quite often and I genuinely thank you for your information. The article has truly peaked my interest.